Firefox bookmarks in Google Chrome
Google explained how you can import your Firefox bookmarks into Chrome:
In Chrome, click on wrench icon on top right corner. Then, go to Options - in new window Personal Stuff. Under Browsing Data click on "Import data from another browser" button. On new window, sellect the Firefox and click Import.
But that way, you will only get Firefox bookmarks folder in
Read more »Labels: bookmarks, Chrome, firefox
 Subscribe in a reader
Keyboard menu key
On computer keyboard (or
keypad as someone calls it) there is Menu key that lots of people didn't ever use. The key is placed on the right side of keyboard between the Window Key and the Control Key. Or between AltGr and Ctrl. Or some other place, anyway it look like this:
When you press it,
Read more »Labels: key, keyboard
Subscribe in a reader
How to hyperlink in Word
So, how to hyperlink in Word? Actual it's pritty easy to link to some webpage from some word or few words. Just select the word you want (or few words or even whole sentence) and right-click your mouse. There pick "Hyperlink". On new window, in field Address type full url where link should go. Do that including http:// prefix, like here on this image:
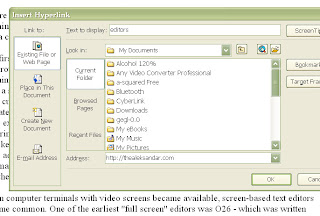
Then, just click OK and the word will be hyperlinked to particular URL.
Labels: hyperlink, Word
Subscribe in a reader
Microsoft Word background for single word
How to add background in Microsoft Word document just for one, single word? Here is little tutorial (or tip) how you can do that.
Select particular word you want make background for. Go to Format - Borders and Shading. On new window, open card for Shading. On color picker palette, pick color you like. Or, you can chose some color from "More colors" button. On right side, where it's "Apply to" pick "Text". This is important since if you chose "Paragraph" whole paragraph will get new background, not just word you selected.
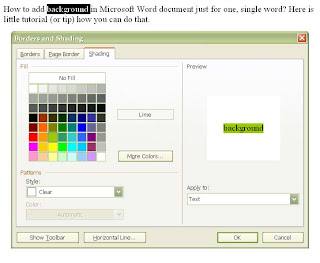
After that, just click OK and your word will get new background color.
The same way you can select few words instead and get those have background with some color, too.
Labels: background, color, Word
Subscribe in a reader
Make shortcut for locking your desktop and keyboard
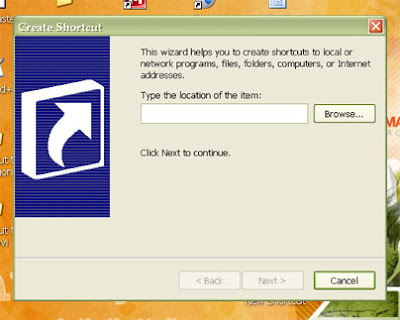
Sometimes you need to move away from computer quick without shutting it down. But there are people near you don't trust. How to keep them not to touch your computer? Lock it. OK, but how to do that quick? Well, you'll do that if you have a shortcut on desktop for looking your computer desktop and keyboard. Just double-click on shortcut. And here's how you'll make that shortcut.
Right-click on desktop.
Take "New > Shortcut".
"Create Shortcut Wizard" opened.
In text field, type: "rundll32.exe user32.dll,LockWorkStation".
Next.
Name your shortcut as you like.
Finish.
Now, you have a shortcut for locking your desktop and keyboard. Here's how you'll change it's icon:
Right-click on shortcut.
Chose "Properties".
Click on "Shortcut" card.
Click "Change Icon".
In "Look for icons in this file" field, type "Shell32.dll".
OK
Chose icon from list.
OK.
Labels: caps lock, desktop, icon, keyboard, shortcuts
Subscribe in a reader
Learn Tricks And Tips Of The New Windows 7

Is Windows 7 the answer to all the questions that Windows Vista poses? Windows 7 is fast, stable and far more reliable than you'd expect.
Windows 7 is full of great new features and enhancements and was built around users feedback, so you'll see a lot of things you've asked for.
Microsoft has made its intentions clear: Windows 7 is intended to right the wrongs Vista wrought, but retain that operating system's good points. The OS will be quicker than Vista, which can only be a good thing.
And while it doesn't include major new features, take the time to explore and you'll find lots of useful changes that will make a real difference in how you use your PC.
Like any version of Windows there are various tips, tweaks and hacks you can perform to get your PC working the way you want it.
This book guides you through the 100 most asked questions on Windows 7 and on how to get the most from your Windows 7 installation.
Labels: Windows 7
Subscribe in a reader
Customizing a bulleted list in Word
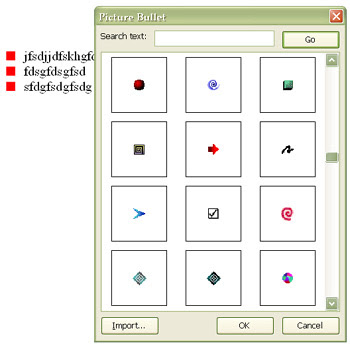
When you make bulletin list in MS Word, you don't need to use plain dashes, dotes or some other plain bullets. You can nicely customize it and use some of plenty available images.
When you made a list, select it and right-click on it. Then, chose "Bullets and Numbering". You can chose some of that you see there but better go to Customize. Then, click on "Picture" button. MS Word will go on internet then, and show you big variety of available images for bullets. Chose one you would like to use in your list and go OK. Simple as that.
Labels: Word
Subscribe in a reader
How to sort rows in Excel 2007
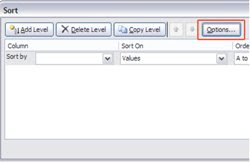
By default, you can sort columns easy in Excel 2007 (and other Excel versions). But what to do when you need to sort rows? Of course, you can do that manually but Excel 2007 can do that for you, too.
Sellect rows you want to sort.
In Ribbon, sellect Data card.
In "Sort & Filter" chose "Sort".
In Sort window, click Options button.
In "Orientation" chose "Sort left to right" radio button.
Click OK.
In Sort window with drop-down menus you can chose order and way you would like to sort rows.
Click OK.
Labels: Excel
Subscribe in a reader
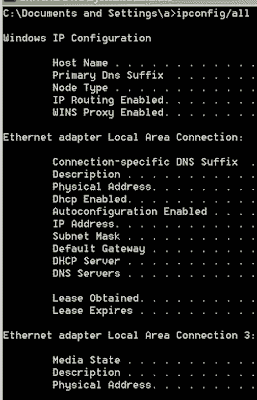
What is my IP address
You would like to know what is your IP address when you are connected on the Internet? You can get your answer on several different ways. You can go to whatismyipaddress.com and you'll see your IP and where are you on Google map. But if you need more information you can go to Start - Run, than type CMD and press ENTER. There, just type
"ipconfig/all" (without quotes) and press ENTER. You will get more than IP address, you'll see full profile of your connection like on image bellow:
Labels: internet
Subscribe in a reader
How to make folder private

If you are not the only user on your computer, you can make some forlders private and only when you log in with your username you can see them. This option is only available for folders included in your user profile. Folders in your user profile include My Documents and its subfolders, Desktop, Start Menu, Cookies, and Favorites. If you do not make these folders private, they are available to everyone who uses your computer.
Open My Computer. Then, double-click the drive where Windows is installed (usually it's drive (C:), unless you have more than one drive on your computer). Double-click Documents and Settings folder. Open your user folder. Right-click folder in your user profile you want make private, and then click Properties. On the Sharing tab, select the Make this folder private so that only I have access to it check box. When you make a folder private, all of its subfolders are private as well. For example, when you make My Documents private, you also make My Music and My Pictures private. When you share a folder, you also share all of its subfolders unless you make them private.
Labels: folder, private, sharing
Subscribe in a reader