How to hyperlink in Word
So, how to hyperlink in Word? Actual it's pritty easy to link to some webpage from some word or few words. Just select the word you want (or few words or even whole sentence) and right-click your mouse. There pick "Hyperlink". On new window, in field Address type full url where link should go. Do that including http:// prefix, like here on this image:
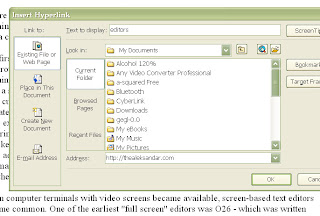
Then, just click OK and the word will be hyperlinked to particular URL.
Labels: hyperlink, Word
 Subscribe in a reader
Microsoft Word background for single word
How to add background in Microsoft Word document just for one, single word? Here is little tutorial (or tip) how you can do that.
Select particular word you want make background for. Go to Format - Borders and Shading. On new window, open card for Shading. On color picker palette, pick color you like. Or, you can chose some color from "More colors" button. On right side, where it's "Apply to" pick "Text". This is important since if you chose "Paragraph" whole paragraph will get new background, not just word you selected.
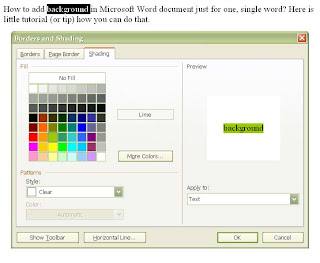
After that, just click OK and your word will get new background color.
The same way you can select few words instead and get those have background with some color, too.
Labels: background, color, Word
Subscribe in a reader
Customizing a bulleted list in Word
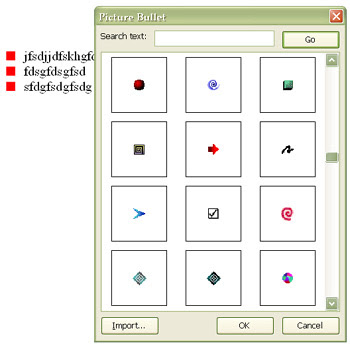
When you make bulletin list in MS Word, you don't need to use plain dashes, dotes or some other plain bullets. You can nicely customize it and use some of plenty available images.
When you made a list, select it and right-click on it. Then, chose "Bullets and Numbering". You can chose some of that you see there but better go to Customize. Then, click on "Picture" button. MS Word will go on internet then, and show you big variety of available images for bullets. Chose one you would like to use in your list and go OK. Simple as that.
Labels: Word
Subscribe in a reader
Change the default custom dictionary in MS Word
Word has simplified the way you work with custom dictionaries.
You don't need to use Notepad to make changesIn previous versions of Word, you opened a separate text editor, such as Notepad, to work with custom dictionary content.
In Word, you don't have to leave your document environment to make changes to your custom dictionaries. Instead, you use a simple, streamlined dialog box that's easily available by selecting the dictionary in the Custom Dictionaries dialog box, and then clicking Modify.
Dictionaries are clearly organized by languageWhen you create or install a custom dictionary, you can associate a particular language with it so that Word only uses the dictionary when you check spelling of text in that language.
The dictionaries are then grouped by language in the Custom Dictionaries dialog box, making it easy to locate and switch between them.
You can quickly change the default custom dictionaryIf you use one custom dictionary more than others, you can quickly make it the default dictionary directly from within the Custom Dictionaries dialog box. The default custom dictionary is the one that words are added to when you select Add to Dictionary during a spelling check.
Labels: Microsoft Office, Word
Subscribe in a reader
Make business cards in MS Word
You can quickly create attractive and professional business cards in two ways using Word:
* Use ready-made business card templates from the Microsoft Office Online Templates Web site.
* Create your own business cards from scratch with the Envelopes and Labels dialog box.
Choose the right paperYou can either have a professional printer print your business cards or you can purchase paper and print them yourself at home. For home printing, Avery® is a popular do-it-yourself brand and provides standard business card paper: 2" X 3.5" cards on 8 1/2" X 11" heavyweight cardstock sheets. The tiny perforations in the sheets allow you to separate your business cards easily with professional results.
If you choose ready-made business cards from the the Microsoft Office Online Templates Web site, look for the Avery product number listed with the template. If you use the Envelope and Label feature in Word, the dialog box shows the product numbers for the Avery business card size you need.

Choose the business card paper you want from the Product number list. The Label information area to the right shows a description of each paper or label type you select.
Work with a ready-made templateIf you start with a template to make your business cards, all you need to do is change the default text to match your company and contact information. In just a few minutes, you'll be ready to print your cards.
Work from scratch using the Envelopes and Labels dialog boxUsing the Envelopes and Labels dialog box, you can either print directly or insert your business cards in a new document for later use.
To make and print your business cards
1. On the Tools menu, point to Letters and Mailings and then click Envelopes and Labels.
2. Click the Labels tab, and in the Address box, enter the company and contact information you want to display on your business card.
3. Right-click to show the shortcut menu, and then choose the formatting and alignment options you want.
4. Under Print, leave the default selected, Full page of the same label. This allows you to print multiple business cards on a perforated, heavyweight cardstock sheet by Avery.
5. Click Options, and under Printer information, choose the printer you want.
6. Under Label products, leave the default selected, Avery Standard.
7. Under Product number, choose the business card number you want, and then click OK. If the product number you want is not listed, one of the listed labels still may be the size paper you want.
8. In the Envelopes and Labels dialog box, do one of the following:
* To print one or more business cards, insert your sheet of Avery heavyweight cardstock into the printer and then click Print.
* To save your business card for later use, click New Document, and then click Save on the Standard toolbar.

1 Address box: Enter your contact information. Using the shortcut menu, you can format and align your text.
2 Print button: Click to print your business cards directly from this dialog box.
3 New Document button: Click to insert your business card information into a Word document for later use.
4 Options button: Click to choose the type and size of Avery paper for your business cards.
5 Label area: View the paper type and size based on your selection in the Label Options dialog box.
Labels: Microsoft Office, Word
Subscribe in a reader
wildcard character
To start, let's define a couple of terms:
* A wildcard character is a keyboard character that you can use to represent one or many characters. For example, the asterisk (*) typically represents one or more characters, and the question mark (?) typically represents a single character.
* In our case, a regular expression is a combination of literal and wildcard characters that you use to find and replace patterns of text. The literal text characters indicate text that must exist in the target string of text. The wildcard characters indicate the text that can vary in the target string.
That may seem a bit abstract, but you've seen (and most likely used) wildcard characters and regular expressions since you first began computing. For example, the Open dialog box (on the File menu, click the Open command) uses the asterisk wildcard character extensively:
Wildcard characters in the Open dialog box
And, if you ever used the MS-DOS operating system, you probably used a command and a simple regular expression to copy files:
copy *.doc a:
That command uses the asterisk wildcard character and the .doc literal text string to copy a set of Word documents to hard disk drive A. If you look around a bit, you'll see that Microsoft Windows® and the Microsoft Office applications use wildcard characters everywhere.
The steps in this section explain how to use a regular expression that transposes names. Keep in mind that you always use the Find and Replace dialog box to run your regular expressions. Also, remember that if an expression doesn't work as expected, you can always press CTRL+Z to undo your changes, and then try another expression.
To transpose names
1. Start Word and open a new, blank document.
2. Copy this table and paste it into the document.
Josh Barnhill
Doris Hartwig
Tamara Johnston
Daniel Shimshoni
3. Press CTRL+F to open the Find and Replace dialog box.
4. If you don't see the Use wildcards check box, click More, and then select the check box. If you don't select the check box, Word treats the wildcard characters as text.
5. Click the Replace tab, and then enter the following characters in the Find what box. Make sure you include the space between the two sets of parentheses: (<*>) (<*>)
6. In the Replace with box, enter the following characters. Make sure you include the space between the comma and the second slash: \2, \1
7. Select the table, and then click Replace All. Word transposes the names and separates them with a comma, like so:
Barnhill, Josh
Hartwig, Doris
Johnston, Tamara
Shimshoni, Daniel
At this point, you may wonder what to do if some or all of your names contain middle initials.
Labels: Microsoft Office, Word
Subscribe in a reader
Caps Lock by accident

How many times you typed long text in MSWord and after you noticed "Caps Lock" were turned on? All you typed were case letters and you have to type again. You can change case with Shift + F3, too, but you have to make further effort and you will get nervous, that's almost shore.
Here's a tip how you can avoid that. You can attach sound to Caps Lock key and you'll here it when you turn it on by an mistake. Here's how you can do that trick:
Go to Start - Settings - Control Panel. Now go to Accessibility Options. Meny "Accessibility Properties" will open. There, chose "Use Toggle Keys" in "Toggle Keys" (in lower meny, click OK and that's it.
Labels: accebility options, caps lock, Word
Subscribe in a reader
Fade callout in Word

In this tutorial you can learn how to make callout colored like this, in MS Word.
Open MSWord and open new document. Go to Insert in menu, and than Picture – AutoShapes. AutoShapes window will pop-up. There you'll see callouts. Click on them and chose callout type (rectangular, rounded rectangular, oval, cloud, line callout, line accent bar, line no border, line border and accent bar). Chose callout you like and it will be added to your Word page. Move mouse pointer at the edge and when you see arrows you can drag them and make callout wider, taller, shorter, ... After you made dimensions you like, move pointer on edge till you see four arrows. Than, right click with your mouse and click on Format AutoShape. In «Colors and lines» in «Fill» «Color» you have drop down menu. Open it and chose «Fill Effects». Under Gradient, chose «Two colors». Pick both colors (I have chose red and black in this case). You can change transparency (I didn't change it for this image). At bottom you can chose Shading styles (horizontal, vertical, diagonal up, diagonal down, from corner, from center). For this callout I have chose horizontal shading style.

Labels: Word
Subscribe in a reader
MS Word thumbnails
Some of you have following problem with MS Word. Everytime you open some document in Word, on left side there are pages mini pics (pictograms). You manage to close that on View – Thumbnails, but next time when you open another document, thumbnails are there again. Default document in Microsoft Word is Normal.dot, so problem is probably there. So, try this:
- Open Word. You should see empty document on screen.
- Click on Menu – Thumbnails to close thumbnails part on left side.
- Click on Tools – Options. Word will show you Options dialog.
- Click on View card.
- Change Startup Task Pane status.
- Go to OK. Options dialog box should close.
- Holding Shift on keyboard, click on File menu and chose Save All.
- When Windows ask you to save empty document – click Cancel.
- When Windows ask you if you want to save template Normal.dot, click Yes.
- Do again 3-6 steps to setup Startup Task Pane box like you like.
Labels: Word
Subscribe in a reader
2 MSWord tricks (interesting table shortcut and text selecting)
Interesting table shortcut in Microsoft WordWhile you're typing in MS Word, just type . +-++ , and you will get table in 1 row with 2 columns. If you type +-+ and ENTER, you will get just 1 cell. So, +, -, and as many plusses as cells you like to make.
Text selecting in Microsoft WordWhile you're working in MSWord, click SHIFT, CTRL and ALT in same time, and that select with mouse. You will see you can select rectangle like in Photoshop.
Labels: Word
Subscribe in a reader
MSWord 2003 compatibility
Documents you wrote in MS Word 2003 you can open in MSWord 97/2000/2002, but there can be some problems with formatting, graphics, ... If you want to avoid that problems, here is tip:
Click Tools-Options-Save
Check
Disable features introduced after and chose
Word 97 or
Word 6.0/95, and click OK.
You can't use this trick with Html word documents, because Word 97 don't support html.
Labels: Word
Subscribe in a reader